Post by bunnie on Aug 29, 2005 22:08:56 GMT 1
Source: i4.photobucket.com/albums/y138/dnBunnie/EV/vBoost/Vmax_Vboost_on_a_1983_Yamaha_Venture.html
Having recently just sold my 1986 Yamaha FJ1200 and buying a 1983 Yamaha Venture. I had no idea of leaving the Venture stock. Especially when I found out that the V-boost off a Vmax woudl bolt right onto a Venture. So I bought A V-boost off Ebay from a 1986 Yamaha Vmax. It was pretty easy to put it on. The hard part was putting the Carbs back on as the V-boost raises up the carb stack.
Click on the pictures to go to a larger version

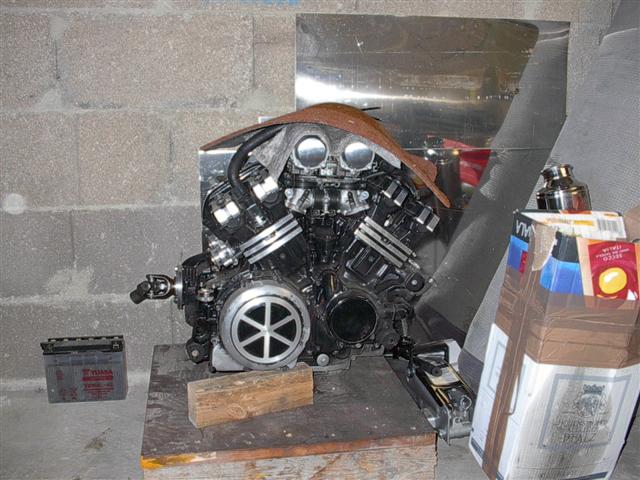
Here is the inital shot of fitting the V-boost intake to the Venture after removing the stock airbox, carbs and intake manifolds.

Ok problem #1 is that the small water hose from the valley on the right side hits the intake manifold at a bad angle. One guy cut off the fitting and bolted on a 90 degree fitting. I determined to see if i could find a different way.

Ok what I did was turn the Hose clamp 90 degrees and then route the water line so that the angle was not so severe. We will have to see if the hose lasts or if their is a issue

I received a tip form Rey on the Venture board that he used the choke cable to turn on his V-Boost. I liked the simplicity of the idea. First issue is that the hole for the cable end was too small

Now the picutre is a little fuzzy but you can see that I drilled out the hole to the size of the choke cable end fitting
The next issue was how to hold the choke cable securley

Iused a nut with two large washers on it to clamp the nut to the bracket. Then bent two large washers so that they would grip the cable when I torqued them down.

Ok Now that I have my intake manifold bolted down with the choke cable working the V-boost. Onto the next issue of mounting the carbs, Airbox first
K&N filter for a 1983 Yamaha Venture

Since the airbox does not fit under the stock cover I decided to remove the airbox coer and use somehtign else to hold the K&N filter down. I used hanger wire to fabricate a holder.

I also removed the air deflector from the air box. I will have to test this on the Dyno later this summer. I have read a few interesting articles on the benefits of a air box. I have also read of how the Yamaha engineers struggled to make the venture emissions friendly in 1983 but had to do several things to restrict the bike. I believe the air box is where they restricted the motor quite a lot.The air path is small and tortuous with many bends.

Here is me trying to get the carbs on the bike. note the 3lbs sledge. The angle is horrid for getting the carbs on. You have to come in from a angle sideways to get the carbs on as the carb bodies actually hit the frame. I ended up spraying the boots heavily with WD-40 to make everything slide in easier. Then I put a plastic bag over carbs, rubber hammer on top of carb body. Then wack the rubber hammer with the 3lb hand sledge to persuade the carbs down into the intake boots. Took three tries to get it on. Rey told me he put his carbs on and off 8 times before he got the jetting correct. I really do not to take them off that many times.
If you are going to do this I highly recommend that you double check everything. I forgot to the put the throttle cables on before I put the carbs in. I had to fight another 40 minutes to get the cables on. The front cable bracket actually needs to be bent up a little bit to fit on the inside of the frame. On the inside throttle cable it is real tough to get on if you don’t get it on before hand. Once you bend the throttle cable to run inside the frame you will have to modify the airbox by cutting a corner off it. I used a Dremel tool to open the corner off and then taped the hole shut.
You will also have to bend the choke bracket to get the carbs in. I have to run a different cable to the choke on the carbs and will post a picture for that later.
Also make sure that you get the air vent hose right. I switched the air vent hose and the Fuel Line hose and had gas shooting out of the air vent. Also you will need to undo the black tie wrap that holds the gas line to the frame to get a little more extension on the fuel hose.
03/20/03 To adjust the carbs I will be using a Dial a Jet kit from Thunder products in place of a jet kit. I do have them installed I just need to upload the pictures and also pictures of the carbs on the bike, and pics of the airbox modifications that I had to do to get it to fit in the bike. I do have them on and the bike is running. I have only gotting it running so far as I had a brake issue with the bike from when I bought it.


Because the Throttle Cables no longer run inside the frame rail instead of outside like they were before you have to make more room out of where the airbox is. This means you have to cut off a corner of the airbox. Which you can see is what I did in this picture. Then in a cheap solution for the moment i wrapped it with electrical tape to seal it back up. I will probably put in a small plastic patch and glue it in later on.just not now.
Notice in Roberts pictures that he cut part of the lid off to get it to fit under the Faux tank cover. I did this myself after driving the bike with no airbox lid. I decided to put it on and tune from their. This way I am starting from a known running configuration

Cable Routing inside the frame rails

I could use a jet kit from a Vmax, but since I kept my Dial a jets from my FJ1200. I will reuse them on this bike. It should take care of my jetting problems also, with a side benifet of when I go up into the moments adjusting for the altitude. The one I have is DJ-108 which goes for $189 on Thunder Products website.
[glow=red,2,300]continued in next posting [/glow]
Having recently just sold my 1986 Yamaha FJ1200 and buying a 1983 Yamaha Venture. I had no idea of leaving the Venture stock. Especially when I found out that the V-boost off a Vmax woudl bolt right onto a Venture. So I bought A V-boost off Ebay from a 1986 Yamaha Vmax. It was pretty easy to put it on. The hard part was putting the Carbs back on as the V-boost raises up the carb stack.
Click on the pictures to go to a larger version

Here is the inital shot of fitting the V-boost intake to the Venture after removing the stock airbox, carbs and intake manifolds.

Ok problem #1 is that the small water hose from the valley on the right side hits the intake manifold at a bad angle. One guy cut off the fitting and bolted on a 90 degree fitting. I determined to see if i could find a different way.

Ok what I did was turn the Hose clamp 90 degrees and then route the water line so that the angle was not so severe. We will have to see if the hose lasts or if their is a issue

I received a tip form Rey on the Venture board that he used the choke cable to turn on his V-Boost. I liked the simplicity of the idea. First issue is that the hole for the cable end was too small

Now the picutre is a little fuzzy but you can see that I drilled out the hole to the size of the choke cable end fitting
The next issue was how to hold the choke cable securley

Iused a nut with two large washers on it to clamp the nut to the bracket. Then bent two large washers so that they would grip the cable when I torqued them down.

Ok Now that I have my intake manifold bolted down with the choke cable working the V-boost. Onto the next issue of mounting the carbs, Airbox first
K&N filter for a 1983 Yamaha Venture

Since the airbox does not fit under the stock cover I decided to remove the airbox coer and use somehtign else to hold the K&N filter down. I used hanger wire to fabricate a holder.

I also removed the air deflector from the air box. I will have to test this on the Dyno later this summer. I have read a few interesting articles on the benefits of a air box. I have also read of how the Yamaha engineers struggled to make the venture emissions friendly in 1983 but had to do several things to restrict the bike. I believe the air box is where they restricted the motor quite a lot.The air path is small and tortuous with many bends.

Here is me trying to get the carbs on the bike. note the 3lbs sledge. The angle is horrid for getting the carbs on. You have to come in from a angle sideways to get the carbs on as the carb bodies actually hit the frame. I ended up spraying the boots heavily with WD-40 to make everything slide in easier. Then I put a plastic bag over carbs, rubber hammer on top of carb body. Then wack the rubber hammer with the 3lb hand sledge to persuade the carbs down into the intake boots. Took three tries to get it on. Rey told me he put his carbs on and off 8 times before he got the jetting correct. I really do not to take them off that many times.
If you are going to do this I highly recommend that you double check everything. I forgot to the put the throttle cables on before I put the carbs in. I had to fight another 40 minutes to get the cables on. The front cable bracket actually needs to be bent up a little bit to fit on the inside of the frame. On the inside throttle cable it is real tough to get on if you don’t get it on before hand. Once you bend the throttle cable to run inside the frame you will have to modify the airbox by cutting a corner off it. I used a Dremel tool to open the corner off and then taped the hole shut.
You will also have to bend the choke bracket to get the carbs in. I have to run a different cable to the choke on the carbs and will post a picture for that later.
Also make sure that you get the air vent hose right. I switched the air vent hose and the Fuel Line hose and had gas shooting out of the air vent. Also you will need to undo the black tie wrap that holds the gas line to the frame to get a little more extension on the fuel hose.
03/20/03 To adjust the carbs I will be using a Dial a Jet kit from Thunder products in place of a jet kit. I do have them installed I just need to upload the pictures and also pictures of the carbs on the bike, and pics of the airbox modifications that I had to do to get it to fit in the bike. I do have them on and the bike is running. I have only gotting it running so far as I had a brake issue with the bike from when I bought it.

Because the Throttle Cables no longer run inside the frame rail instead of outside like they were before you have to make more room out of where the airbox is. This means you have to cut off a corner of the airbox. Which you can see is what I did in this picture. Then in a cheap solution for the moment i wrapped it with electrical tape to seal it back up. I will probably put in a small plastic patch and glue it in later on.just not now.
Notice in Roberts pictures that he cut part of the lid off to get it to fit under the Faux tank cover. I did this myself after driving the bike with no airbox lid. I decided to put it on and tune from their. This way I am starting from a known running configuration

Cable Routing inside the frame rails

I could use a jet kit from a Vmax, but since I kept my Dial a jets from my FJ1200. I will reuse them on this bike. It should take care of my jetting problems also, with a side benifet of when I go up into the moments adjusting for the altitude. The one I have is DJ-108 which goes for $189 on Thunder Products website.
[glow=red,2,300]continued in next posting [/glow]


 Vee Boost on a Venture , The mind boggles!!